Why do this?
Pihole is a DNS server that you are able to run on your home network. Managing your own DNS server gives you the option to filter all internet traffic for all your devices on your network. Pihole is primarily focused on filtering out ads which is exactly what we are planning to do.
How does Pihole work?
Pihole is a DNS server. DNS stands for Domain Name System. A DNS server matches up a domain name to an IP address. For this reason, DNS servers are known as the phone book of the internet. A DNS server is what allows us to pull up google.com without ever having to type in an IP address into our browser.
When google.com is typed into the browser, the computer reaches out to a DNS server to get the IP address for that domain. Then your computer uses that IP address to go to the webserver and pull down the webpage (in this example, google.com) to your computer.
For a more detailed explanation of how a DNS server works, you can look at cloudflare’s explanation here.
What you need to follow along
- Primary desktop or laptop
- Ethernet Cord (for your server you will set up)
One of the following:
- Old laptop/computer with a USB flash drive
- Orange-pi 3 LTS with an SD card and SD card reader
- Raspberry Pi with an SD card and SD card reader
Note: ethernet cord isn’t required if you can connect the computer wirelessly to the network. If your server is meant to be up and running all the time (like in this case), an ethernet connection is the most reliable option.
Installing Ubuntu Server
First thing we need to do is install ubuntu server.
If you are using an old computer or laptop of some sort for your server, you will need to navigate to https://ubuntu.com/download/server and download the correct version for you.
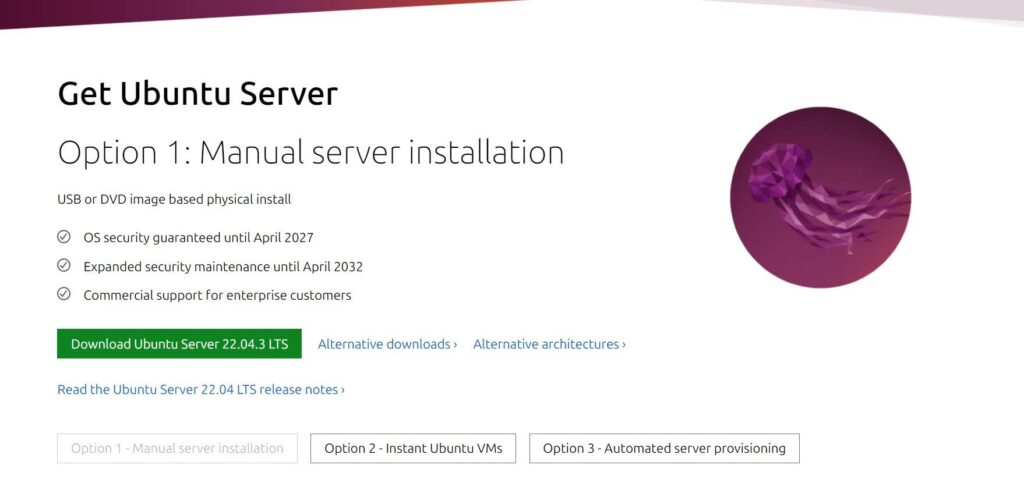
For most people downloading whatever Ubuntu Server version is recommended by the green button will work fine. If you know you have an alternative computer architecture you need to support like an ARM based system, you can find the correct version for you in alternate downloads.
For those of us using hardware like the orange pi or raspberry pi, we want to navigate to the site to either the orange pi site http://www.orangepi.org/html/serviceAndSupport/index.html or raspberry pi site https://www.raspberrypi.com/software/.
For the raspberry pi, you can download their raspberry pi imager.
For the orange pi, select the hardware you are using first. For me, I am using the Orange Pi 3 LTS. Then you can go to the download page for your selected hardware. They host their downloads on google drive so make sure you read the full name of the software you download to make sure it’s a 64bit ubuntu server image.
Flashing USB/SD Card
For the raspberry pi, make sure you select the 64 bit raspberry pi OS lite for an experience almost identical to Ubuntu Server. BEFORE hitting flash, go into settings and enable SSH with your chosen name and password. Then you may select your SD card reader and hit flash.
The orange pi and traditional ubuntu server download both use OS images and require balenaEtcher etcher to flash your USB stick or SD card. You can download balenaEtcher at https://etcher.balena.io/. In order to flash, you select the OS image you downloaded and the USB stick or SD card reader you plugged in.
Powering on the Server
For the people using an old computer of some sort and a USB stick, you may have to connect a keyboard and monitor to your server to go through the setup when you power it on. After you have completed the setup, plug in your ethernet cord so it’s connected to the network. Then, make sure SSH is up and running. This blog post shows you how. Also feel free to take note of the IP address now so it’s easy to connect to later.
For those of us with the Raspberry Pi or Orange Pi, there is no need to connect a monitor or keyboard. All you need to do is plug in power and your ethernet cord and power it on.
Finding Server IP Address
In order to connect to our server, we need its IP address. The easiest way to do this without directly connecting a monitor and keyboard, is to log into your router. Your router assigns IP addresses to devices on your network though what is called a Domain Host Configuration Protocol (DHCP) server. This is the server we will be looking at once we log in. It will also allow us to reserve an IP address for our server so we don’t have to worry about it changing.
To know the IP address of our router we can run the ipconfig command in the command prompt. This only works if we are on windows but for mac you can use ifconfig. Your router IP will be under the default gateway for windows and under inet for mac users. Since I’m on windows, this is what my view looks like.
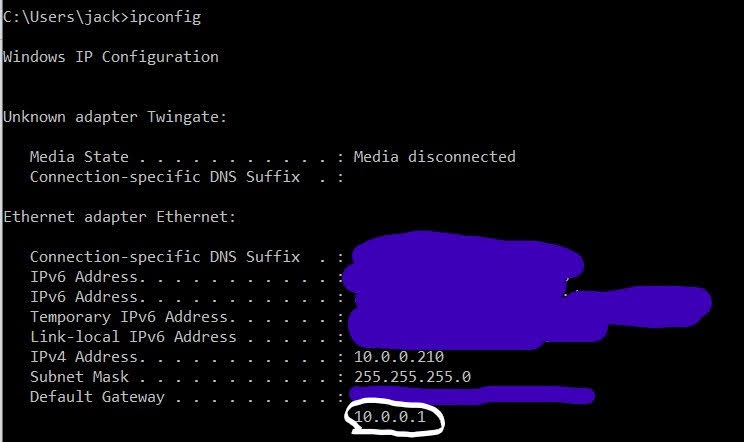
Paste the IP address into your browser and hit enter. It should bring you to a web portal to log into your router. If you are using an xfinity router like me, the default username should be admin and the default password should be password. You will be prompted to change your password after you log in. If this isn’t the case for you, your best bet is to look up your router model number or contact your Internet Service Provider if you are using their equipment.
After signing in, you want to navigate to where you can see the clients (devices) connected to your network. This may be under DHCP or another name. Router software and layout can differ from device to device. In my case, I navigate to the “Connected Devices” section.
Below is an example of different router software.
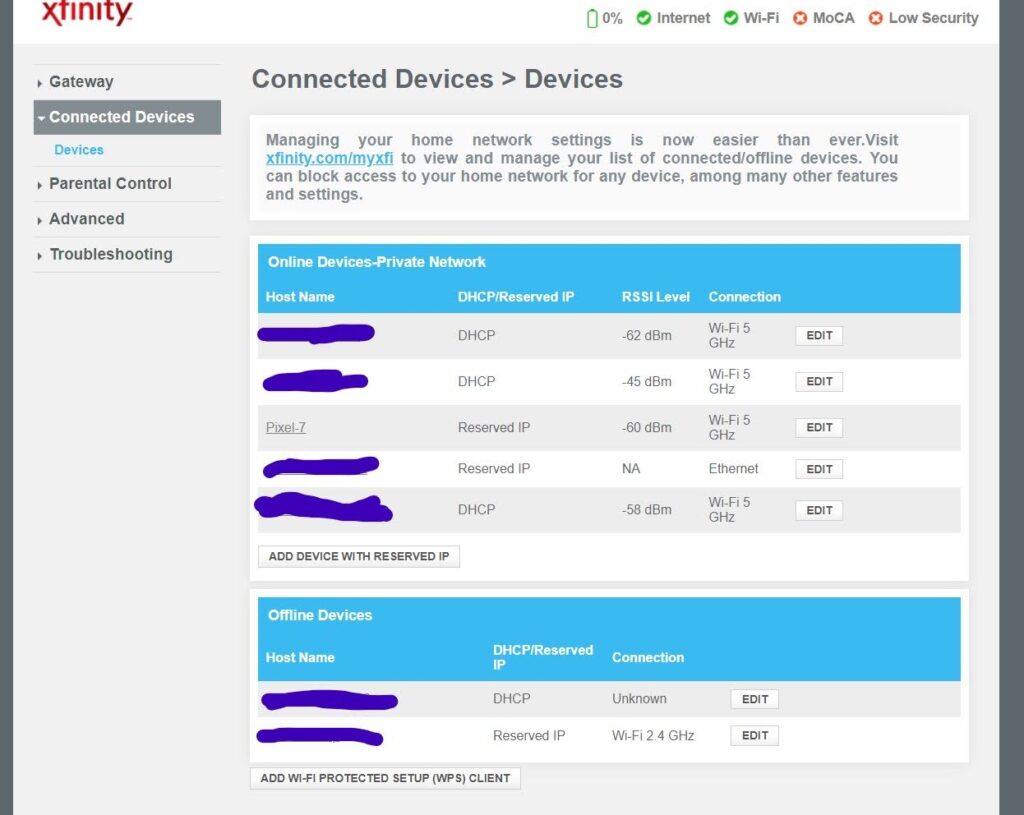
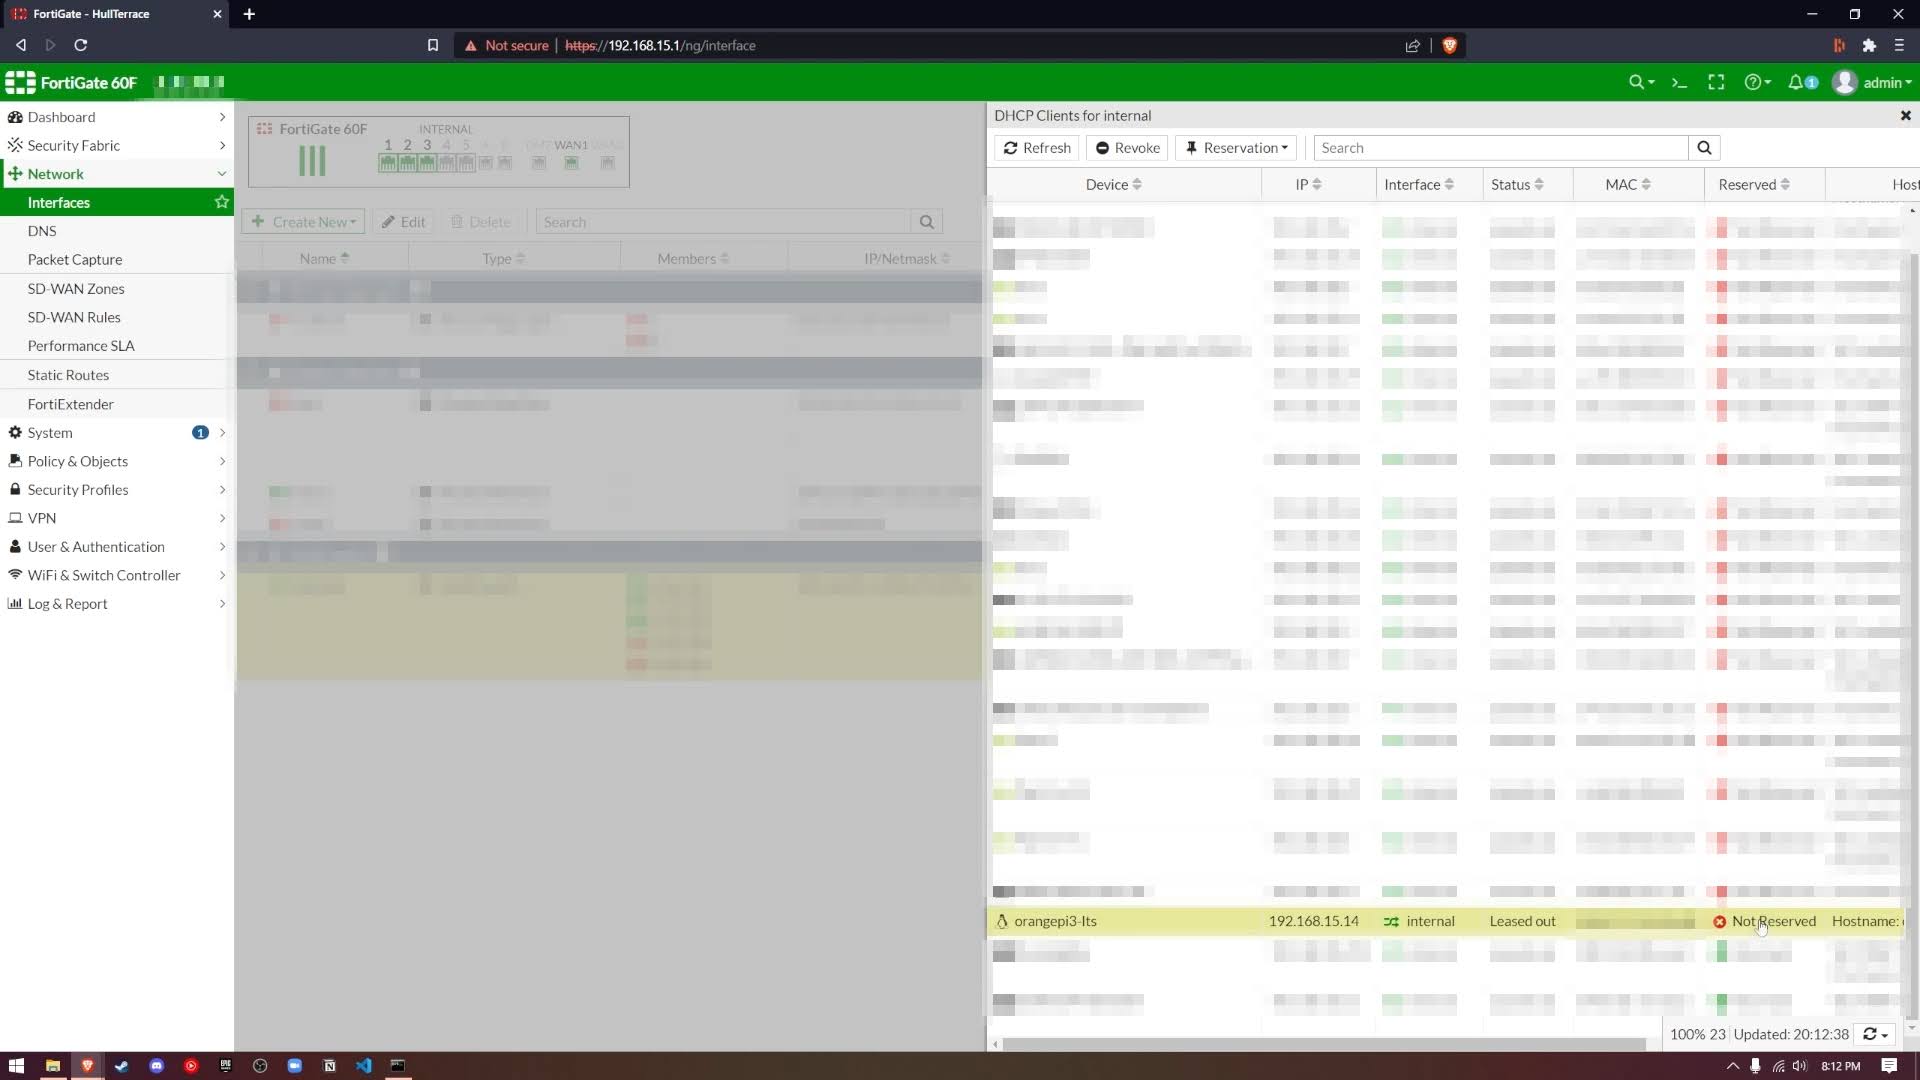
The orange pi or raspberry pi should automatically have a noticeable name for you to identify in the list. In order to see the IP address of the device on my Xfinity router, I can hit edit to see the IP address assigned to it. Otherwise it might be visible like on my Enterprise Router image. This is also a good opportunity to hit “reserve” so your server will always have the same IP address on your home network and you won’t have to worry about anyone else getting it on accident as well.
Take note of the IP address since this is how we will be connecting to the server.
Connecting the Server
To connect to the server, we need to open up a command prompt or powershell if on windows or terminal if on mac or linux. We will use the SSH (Secure Shell) command to connect to our machine. The format looks like this:
ssh username@ip_address
For me, using the orange pi, I know the default username will be “orangepi” from documentation. Raspberry Pi should also mention the username when you selected the OS from the imager. I also have my IP address from seeing it on the router. My SSH command will look like this:
ssh orangepi@192.168.15.14
After connecting, say yes to finger printing and you will be prompted for password. OrangePi default password is also “orangepi”. Once logged in, we will proceed to installing docker. Before we do so, we need to do some important server configuration.
First we should change the password to something more secure. We can do this using with the following command.
passwd
And then follow the prompt to type in your current and new password.
The last thing we need to do before installing Docker is to disable the DNS server already running on the device. Ubuntu server automatically runs a DNS server. So if we try to run a DNS server in Docker on top of this, we will run into errors because they will attempt to use the same port 53. To disable the DNS server, we use the following commands:
sudo systemctl disable systemd-resolved
sudo systemctl stop systemd-resolved
This stops the DNS service that your server relies on to ping and connect to domains on the internet. In order to change the DNS server used by our server, we edit the following file using this command:
nano /etc/resolv.conf
When we edit this file, we change the IP address in front of “nameserver” to any public DNS server. I chose cloudflare so I replaced the IP address to 1.1.1.1. We can change this to a loopback address later after we set up our DNS server on docker.
Docker Installation
First we need to update our lists of available packages to make sure we install the latest version.
sudo apt update
After updating, we can install docker with:
sudo apt install docker.io
Installing Portainer
The documentation on their website does a fantastic job of explaining it and its very simple. You can find the documentation here: https://docs.portainer.io/start/install-ce/server/docker/linux
Portainer gives us a web interface to manage docker on our server. After setting this up, we do not have to do any more command line and we can interact with our server solely through our browser.
Connecting to Portainer
We can connect to Portainer through our browser. The format will look like:
https://ip_address:9443
So for example, what I would enter into my browser will be:
https://192.168.15.14:9443
It is imperative you follow this format because the HTTPS protocol and the port 9443 are required to connect.
You should be prompted to create a username and password to log into Portainer for the first time. Make sure you keep track of all these logins.
Setting up Pihole in Portainer
Once on the Portainer web page after signing in, you should click on the Stacks tab underneath the Local section.
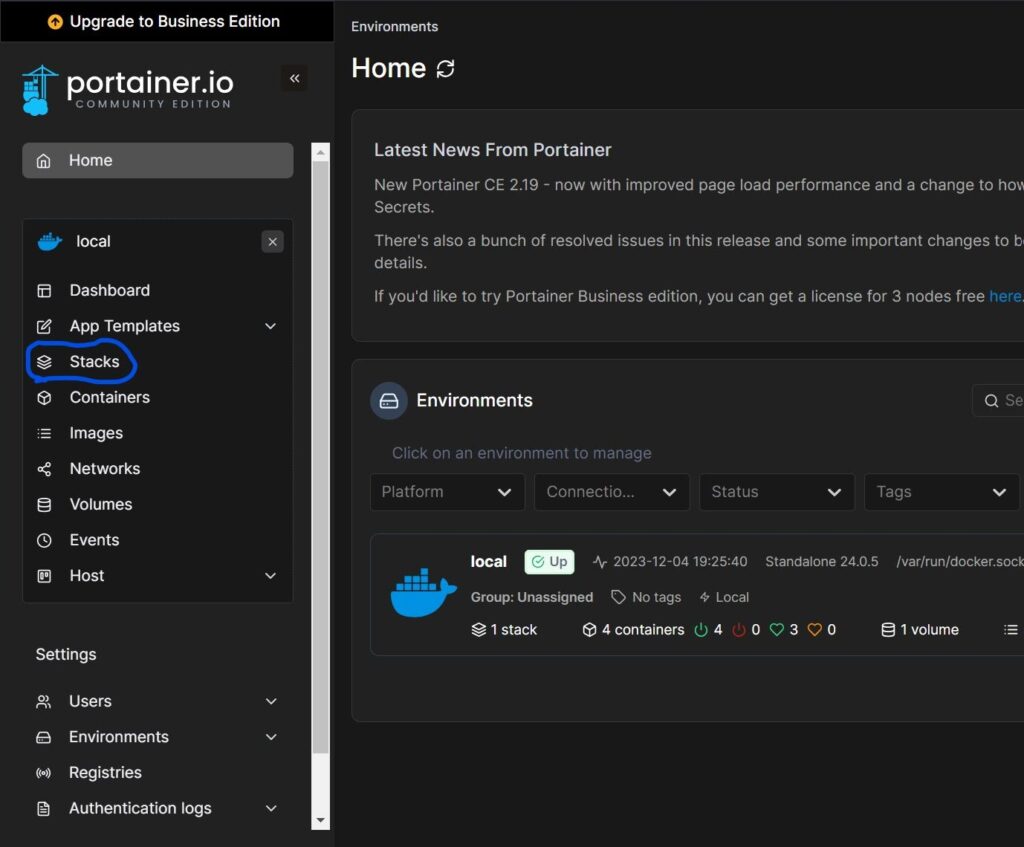
Deploying a stack is essentially the same as using docker-compose from the command line but we get a nice GUI instead. Click + add stack to deploy a new stack. You can find the docker-compose file needed for this section at my GitHub here, https://github.com/jackwaterloo/pihole-setup. You can look at the official Pihole docker repository here, https://github.com/pi-hole/docker-pi-hole, for their directions for deployment as well. I suggest using mine since I change the port mapping and password accordingly. Paste the docker compose contents into the web editor. Don’t forget to name your stack Pihole or something like that.
When it is all pasted in, the stack should look like so:
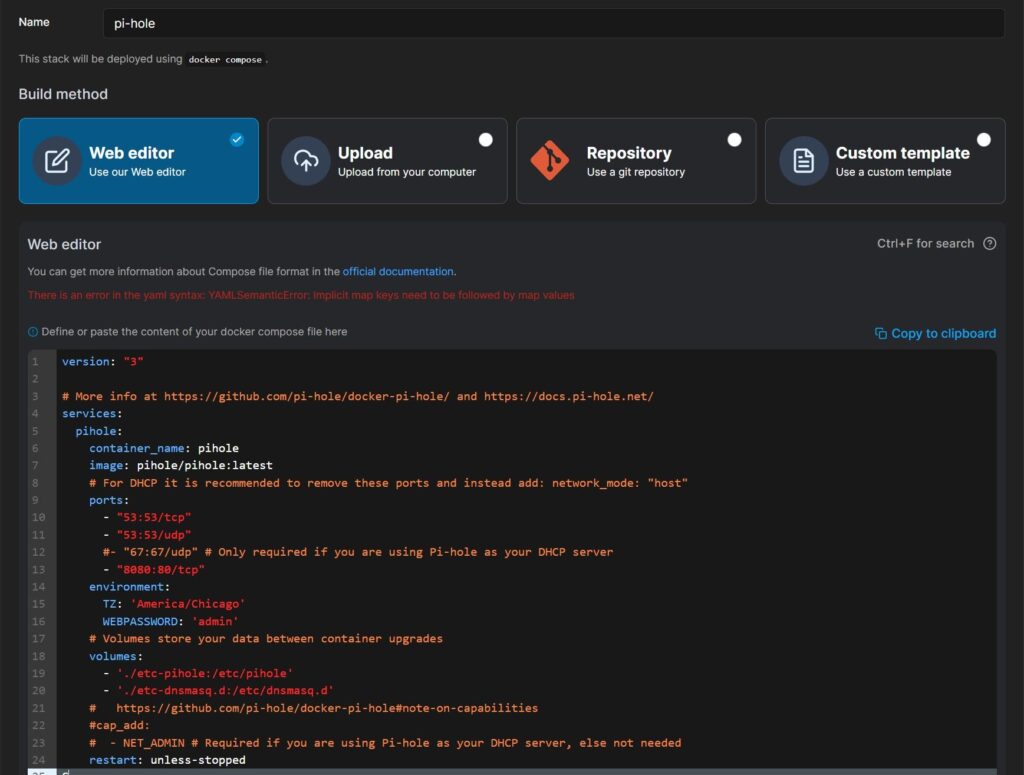
It is important to know what the WEBPASSWORD field is in the docker-compose file because that is the password you will use to sign into the Pihole service when it is up and running. Also note the mapping of port 80. I recommend you use port 8080 as I have it in my pihole-compose.yml file on github. If you deploy it but can’t figure out the login, you can always redeploy the stack with a different password.
I won’t be explaining more about docker compose than that. If you are more interested in knowing what this entire file means, this video is a great intro to docker compose. Otherwise you can look at the documentation here: https://docs.docker.com/compose/.
If your screen looks similar, you can hit deploy at the very bottom of the page. It may take a little to download the container and deploy it according to the compose-file.
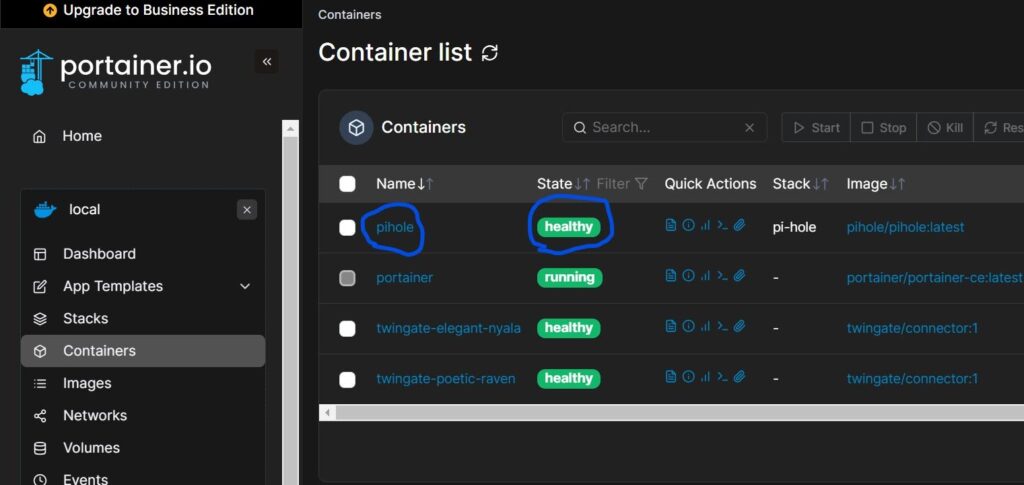
Once you see the Pihole container as up in the container section under local, we can proceed in connecting to the Pihole admin page.
Connecting to Pihole
Pihole will run on a different port on the same IP address used to connect to Portainer. It should follow this format:
http://ip_address:8080/admin
So in my case it would look like this:
http://192.168.15.14:8080/admin
Once getting to the login page, type in the password you entered into the Pihole stack.
Updating Blocklist
Once in, we see the dashboard with the number of blocked domains. These are pre-loaded but we can add other domains as well. If you visit https://firebog.net/, we can see a number of other updated lists in green. We can grab all the lists in green according to what you want to block.
First on Pihole, navigate to the adlists tab.
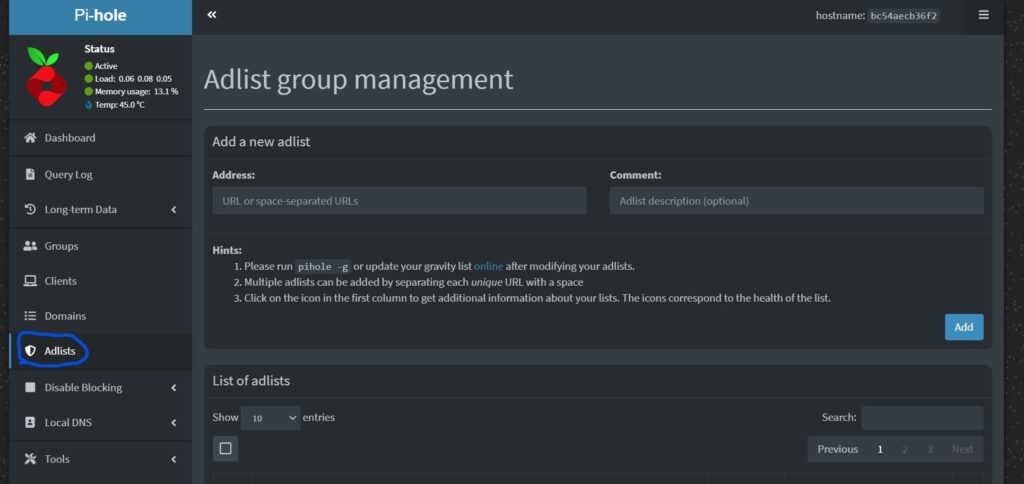
Then we can navigate to firebog.net and grab the lists we want. In this example, I will just add the advertising lists. Highlight the URLs with check marks by them like so:

Then paste them in the box text box labeled Address. In the text box next to it labeled Comment type “advertising lists”. It should look like the following:

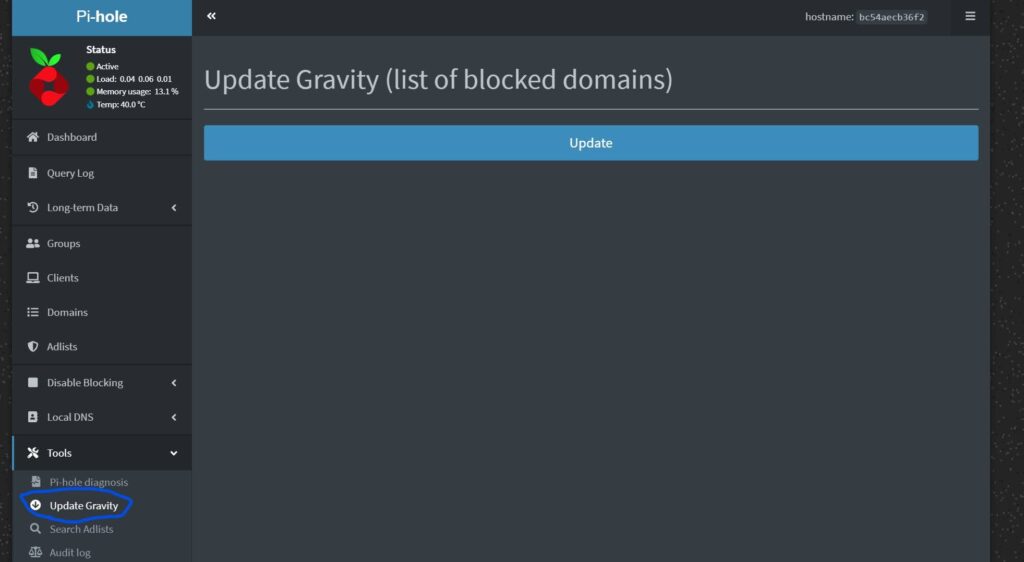
Click the add button below there and it will add the lists. However this does not update it on our current running Pihole DNS server. So to update it, we need to navigate to Tools and then upgrade gravity.
Configuring your computer to use Pihole
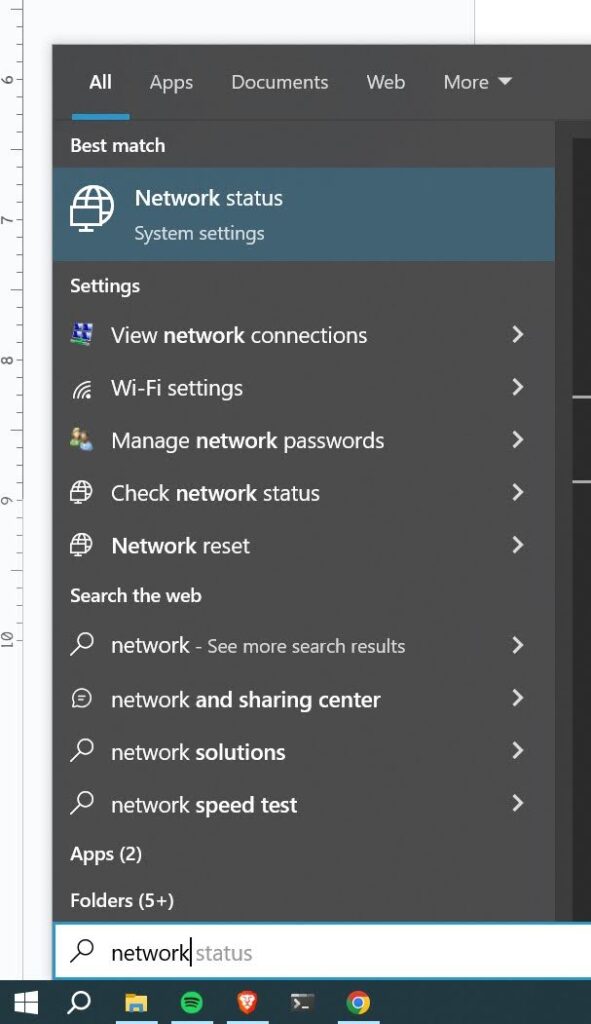
Hit the windows key and search for “network”. Hit network status to bring up network settings.
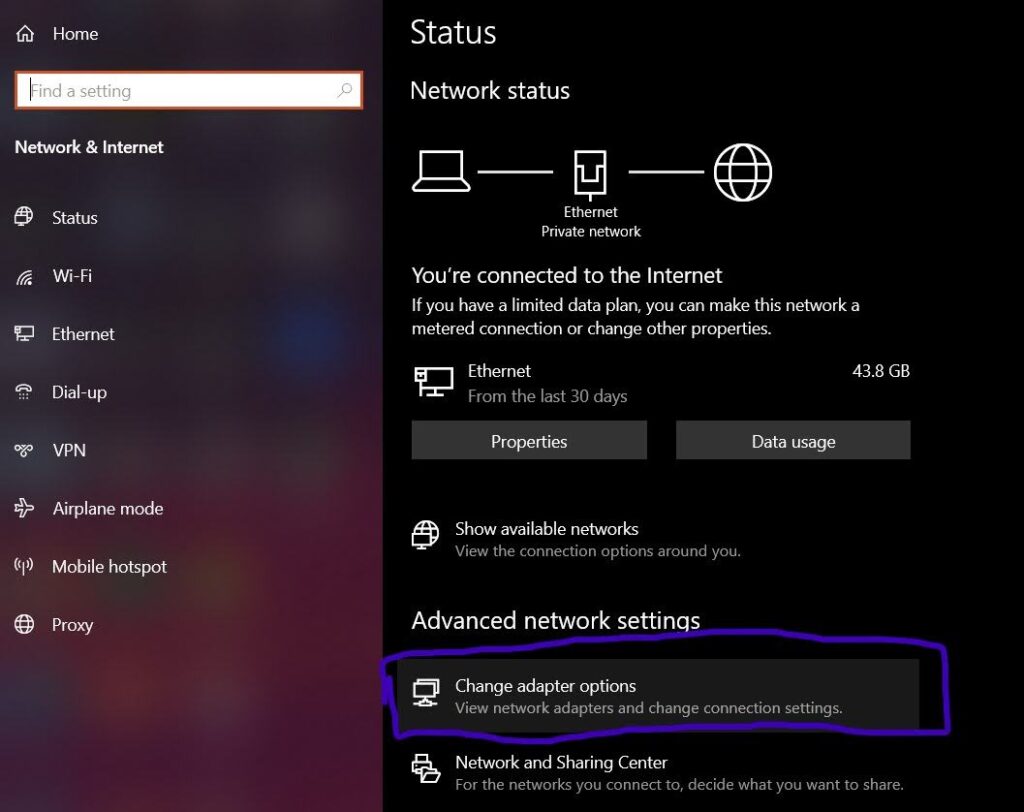
In network settings, click change adapter options.
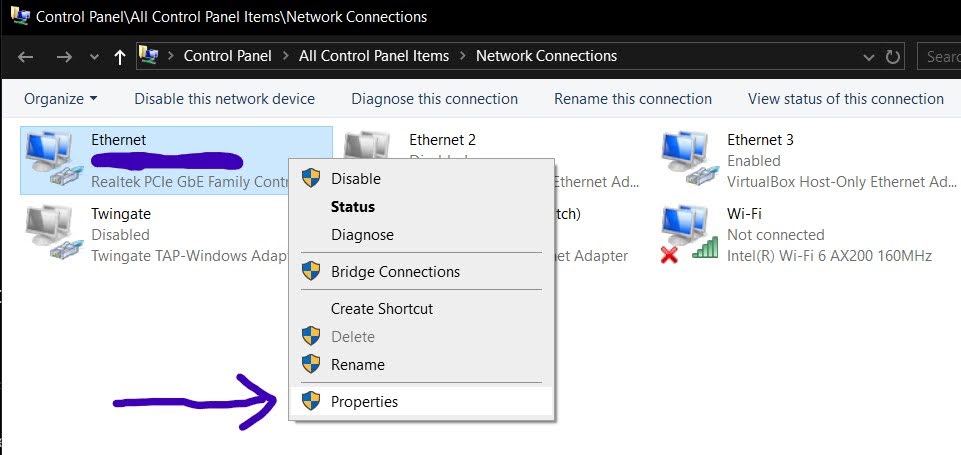
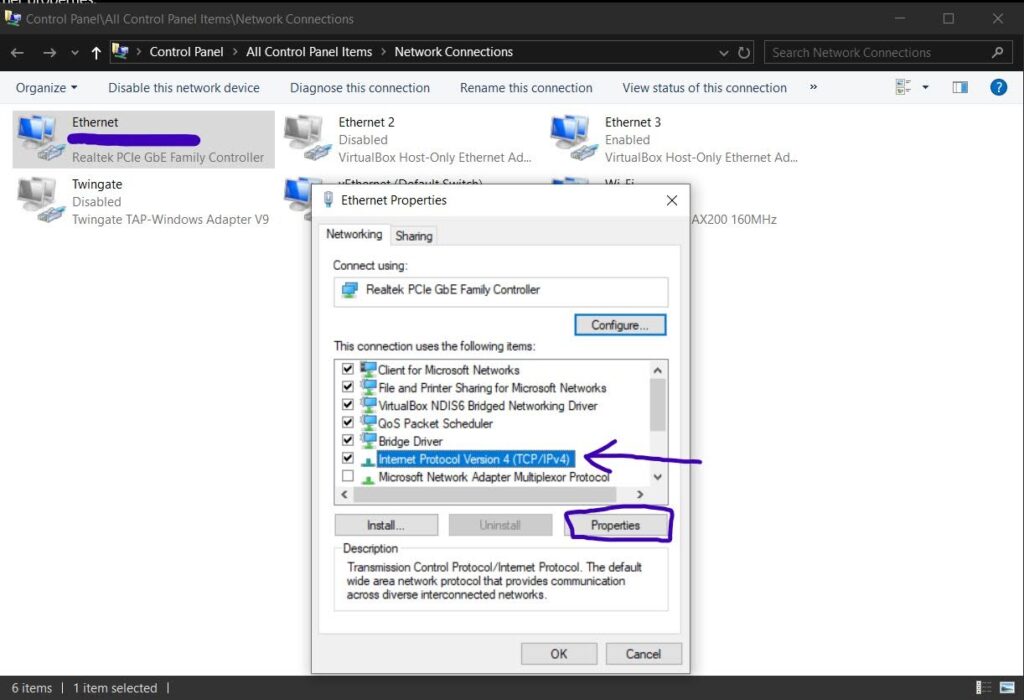
This will pull up a list of your network interfaces. You might see network interfaces related to the VPN services you have, as well as for ethernet and wireless connections. Right click whatever network interface you are using to connect to your network and hit properties.
Under the networking tab, you will have to scroll to find Internet Protocol Version 4 and hit properties.
Click use the following DNS server check box and enter in the ip address of your server. You can leave the alternative DNS server blank. For example mine will look like the following:
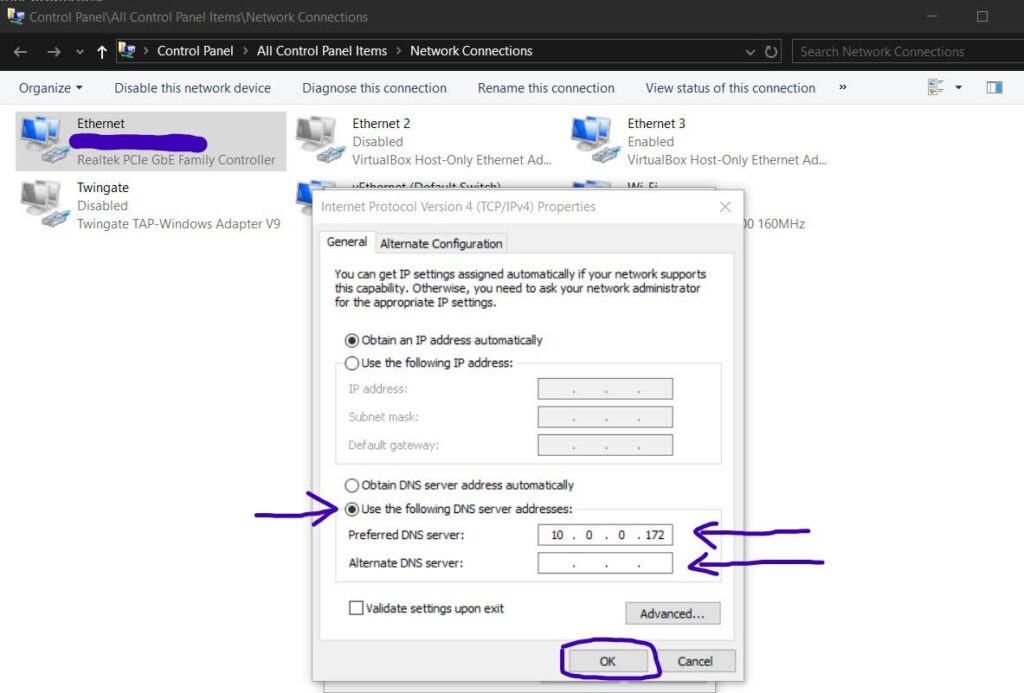
You can now hit ok and you will now be using Pihole for all DNS service. Ads should now be blocked.
If Ads Still Appear
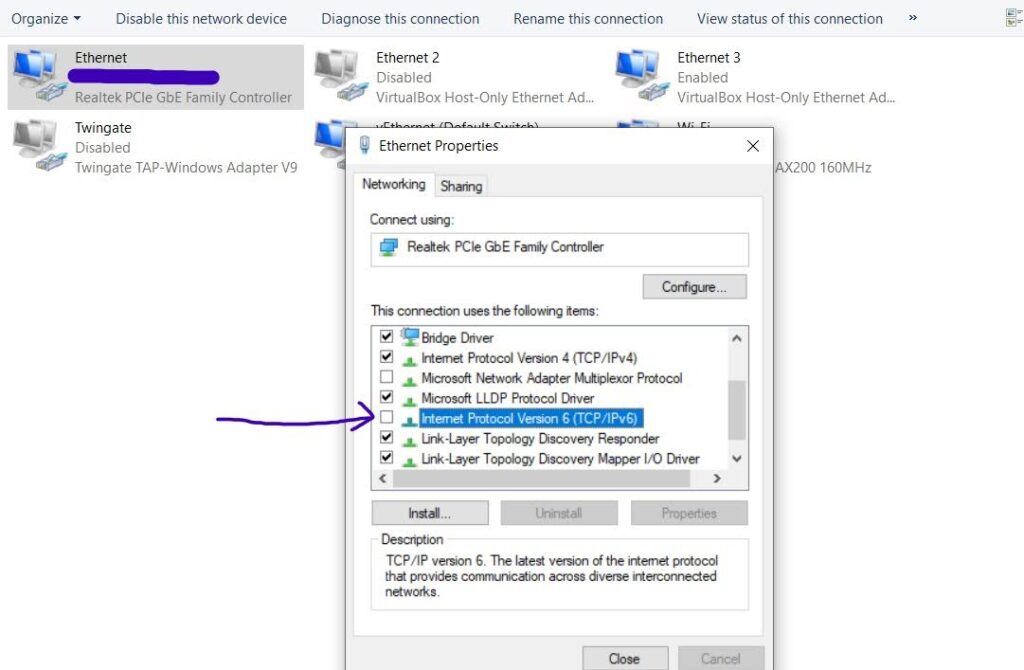
I ran into issues with my router assigning alternative DNS servers through IPV6 so I had to disable that setting. To disable IPV6, we can go back to the same section where we selected internet protocol version 4 but uncheck internet protocol version 6.
The End
Hope this tutorial got you up and rocking with no ads on your device!

